


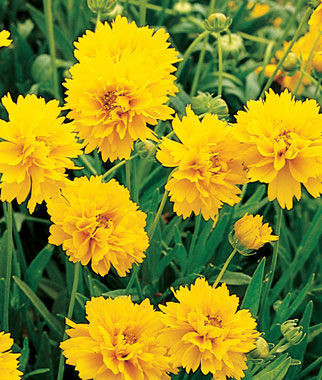
Shasta Daisy, Sweet Daisy Sofie


€20.69
(Price per package)
Lets loose a florific profusion of dense, radiant blooms with spoon-shaped white petals arrayed around large golden button eyes. Strong-stemmed, well-branched plants provide extended flowering period starting in late spring. Mingles nicely with perennials or annuals in a mixed container.
- Gurneys Seeds (Spain)
- Spring
- Summer
- Full Sun
- 8-12 inches
- 10-12 inches
- Perennial
Shasta Daisies: Indoor Sow or Potted Plant Perennial
How to Sow and Plant
Shasta daisies may be grown from seed sown early indoors and transplanted outside after frost, or grown from potted plants.
Sowing Seed Indoors:
- Sow seeds indoors 8 weeks before last spring frost.
- Sow seeds thinly and evenly and cover with 1/8 inch of seed starting formula.
- Keep the soil moist at 70 degrees F.
- Seedlings emerge in 15-21 days.
- As soon as seedlings emerge, provide plenty of light on a sunny windowsill or grow seedlings 3-4 inches beneath fluorescent plant lights turned on 16 hours per day, off for 8 hours at night. Raise the lights as the plants grow taller. Incandescent bulbs will not work for this process because they will get too hot. Most plants require a dark period to grow, do not leave lights on for 24 hours.
- Seedlings do not need much fertilizer, feed when they are 3-4 weeks old using a starter solution (half strength of a complete indoor houseplant food) according to manufacturer’s directions.
- If you are growing in small cells, you may need to transplant the seedlings to 3 or 4 inch pots when seedlings have at least 2 pairs of true leaves before transplanting to the garden so they have enough room to develop strong roots.
- Before planting in the garden, seedling plants need to be “hardened off”. Accustom young plants to outdoor conditions by moving them to a sheltered place outside for a week. Be sure to protect them from wind and hot sun at first. If frost threatens at night, cover or bring containers indoors, then take them out again in the morning. This hardening off process toughens the plant’s cell structure and reduces transplant shock and scalding.
Planting in the Garden:
- Select a location in full sun with well-drained soil.
- Prepare the bed by turning the soil under to a depth of 6-12, inches removing any debris, and lightly raking as level as possible.
- The addition of organic matter (leaf mold, compost, well-rotted manure) benefits all gardens and is essential in recently constructed neighborhoods.
- Plant on a cloudy day or in late afternoon to reduce transplant shock.
- Dig a hole for each plant large enough to amply accommodate the root ball.
- Unpot the plant and gently loosen the root ball with your hands to encourage good root growth.
- Place the top of the root ball even with the level of the surrounding soil. Fill with soil to the top of the root ball. Press soil down firmly with your hand.
- Thoroughly water and apply a light mulch layer on top of the soil (1-2 inches) to conserve water and reduce weeds.
How to Grow
- Keep weeds under control during the growing season. Weeds compete with plants for water, space and nutrients, so control them by either cultivating often or use a mulch to prevent their germination.
- Mulches also help retain soil moisture and maintain even soil temperatures. For perennials, an organic mulch of aged bark or shredded leaves lends a natural look to the bed and will improve the soil as it breaks down in time. Always keep mulches off a plant’s stems to prevent possible rot.
- Careful watering is essential in getting perennials off to a good start. Water thoroughly at least once a week to help new roots grow down deeply. Soil should be damp at about 1 inch below the soil surface. You can check this by sticking your finger in the soil. Water early in the morning to give all leaves enough time to dry. One inch of rain or watering per week is recommended for most perennial plants. You can check to see if you need to add water by using a rain gauge.
- Until plants become established, some protection from extreme winds and direct, hot sunlight may be necessary. Good air movement is also important.
- After new growth appears, a light fertilizer may be applied. Keep granular fertilizers away from the plant crown and foliage to avoid burn injury. Use low rates of a slow release fertilizer, as higher rates may encourage root rots.
- “Deadhead”, remove spent flower heads to encourage continuous flowering and prevent seed development.
- Pinch back to refresh foliage after blooming.
- Remove and discard foliage after a hard frost in fall.
- In colder regions, apply another layer of mulch (1-2 inches) after the ground freezes in fall. Evergreen boughs (from Christmas trees) provide additional protection. Remove this mulch in the spring.
Growing Tips
- Divide every other year.
- Shasta daisies are drought resistant, and make great cut flowers, and work well in beds, borders, containers and meadow gardens.
-
Oswald
Add review
Recently Viewed
© 2019 Vegetable Seeds – Vegetable Seed Store